앱을 만들면서 항상 기본적으로만 사용했던 UITableView에 대해 찾아보다
Editing Mode를 사용하는 방법이 있어서 기록해둔다.
1. UITableView 추가
우선 UITableView와 UITableView를 조작할 버튼들을 추가한다.
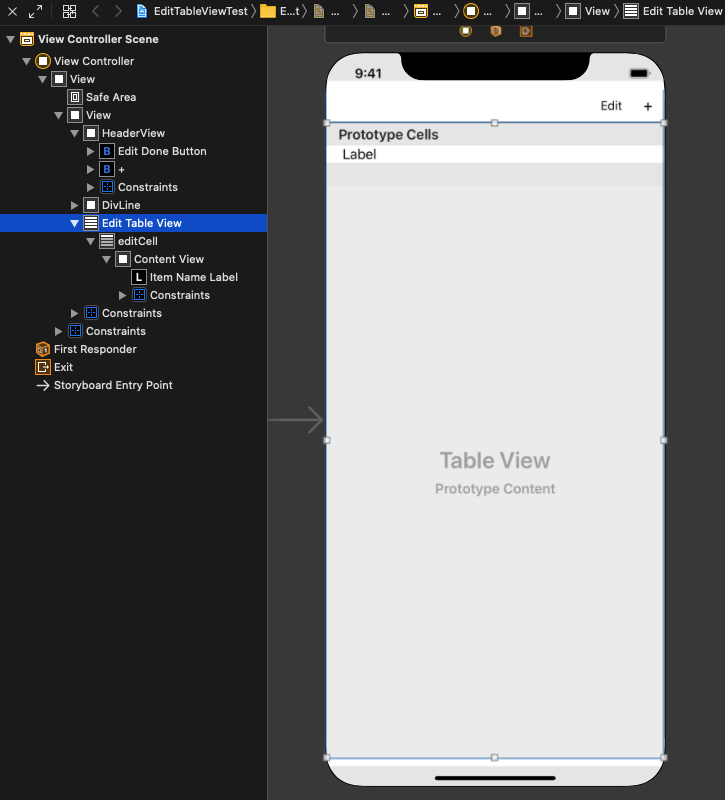
필요한 IBOutlet, IBAction들을 연결하여 추가하고
itemName에 String 값 20개씩 넣어줄 add20Items()를 생성했다.
|
1
2
3
4
5
6
7
8
9
10
11
12
13
14
15
16
17
18
19
20
21
22
23
24
25
26
27
28
29
30
|
class ViewController: UIViewController {
@IBOutlet weak var editTableView: UITableView!
@IBOutlet weak var editDoneButton: UIButton!
var itemName = [String]()
override func viewDidLoad() {
super.viewDidLoad()
self.add20Items()
}
// append item to itemName
func add20Items() {
print("add20Items")
for _ in 0..<20 {
self.itemName.append("\(self.itemName.count+1)번")
}
self.view.hideActivityIndicatorView()
}
// editDoneButton Action
@IBAction func editTable(_ sender: Any) {
}
// plusButton Action
@IBAction func addItem(_ sender: Any) {
}
}
|
cs |
2. Cell 생성 및 연결
Cell 내부에는 UILabel이 있으며 UITableViewDelegate에서 Cell을 생성할 때 text값을 넣어주기 위해
IBOutlet으로 Label을 추가하여 EditTableViewCell을 생성하였다.
|
1
2
3
4
5
6
7
8
9
10
11
12
13
14
15
16
|
class EditTableViewCell: UITableViewCell {
@IBOutlet weak var itemNameLabel: UILabel!
override func awakeFromNib() {
super.awakeFromNib()
// Initialization code
}
override func setSelected(_ selected: Bool, animated: Bool) {
super.setSelected(selected, animated: animated)
// Configure the view for the selected state
}
}
|
cs |
3. UITableView 구현
UITableView를 사용하려면 DataSource와 Delegate를 상속하고 구현해줘야한다.
ViewControlle에 DataSource를 상속하고

DataSource에 대해 구현해야할 것들을 구현해준다.
numberOfRowsInSection은 TableView의 Row 개수를 반환하는 메소드이고
cellForRowAt는 cell을 생성하여 각 cell에 대해 구현하는 메소드이다.
|
1
2
3
4
5
6
7
8
9
10
11
12
13
14
15
16
17
|
//MARD: - UITableViewDataSource
extension ViewController: UITableViewDataSource {
// Row 개수
func tableView(_ tableView: UITableView, numberOfRowsInSection section: Int) -> Int {
return self.itemName.count
}
// Row의 Cell 생성
func tableView(_ tableView: UITableView, cellForRowAt indexPath: IndexPath) -> UITableViewCell {
let cell = tableView.dequeueReusableCell(withIdentifier: "editCell", for: indexPath) as! EditTableViewCell
cell.selectionStyle = .none
cell.itemNameLabel.text = self.itemName[indexPath.row]
return cell
}
}
|
cs |
ViewController에 Delegate를 상속하고 heightForRowAt 메소드를 구현한다.
|
1
2
3
4
5
6
7
8
9
|
//MARD: - UITableViewDelegate
extension ViewController: UITableViewDelegate {
// Row의 높이 설정
func tableView(_ tableView: UITableView, heightForRowAt indexPath: IndexPath) -> CGFloat {
return 50
}
}
|
cs |
이제 viewDidLoad()에서 dataSource와 delegate를 self로 지정한다.
화면이 load되면 add20Items()가 호출되기 때문에 add20Items()가 끝날 때 reloadData()를 호출해준다.
|
1
2
3
4
5
6
7
8
9
10
11
12
13
14
15
16
17
18
19
20
21
22
23
24
25
26
27
28
29
30
31
32
33
|
class ViewController: UIViewController {
@IBOutlet weak var editTableView: UITableView!
@IBOutlet weak var editDoneButton: UIButton!
var itemName = [String]()
override func viewDidLoad() {
super.viewDidLoad()
self.editTableView.dataSource = self
self.editTableView.delegate = self
self.add20Items()
}
// append item to itemName
func add20Items() {
print("add20Items")
for _ in 0..<20 {
self.itemName.append("\(self.itemName.count+1)번")
}
self.editTableView.reloadData()
self.view.hideActivityIndicatorView()
}
// editDoneButton Action
@IBAction func editTable(_ sender: Any) {
}
// plusButton Action
@IBAction func addItem(_ sender: Any) {
}
}
|
cs |
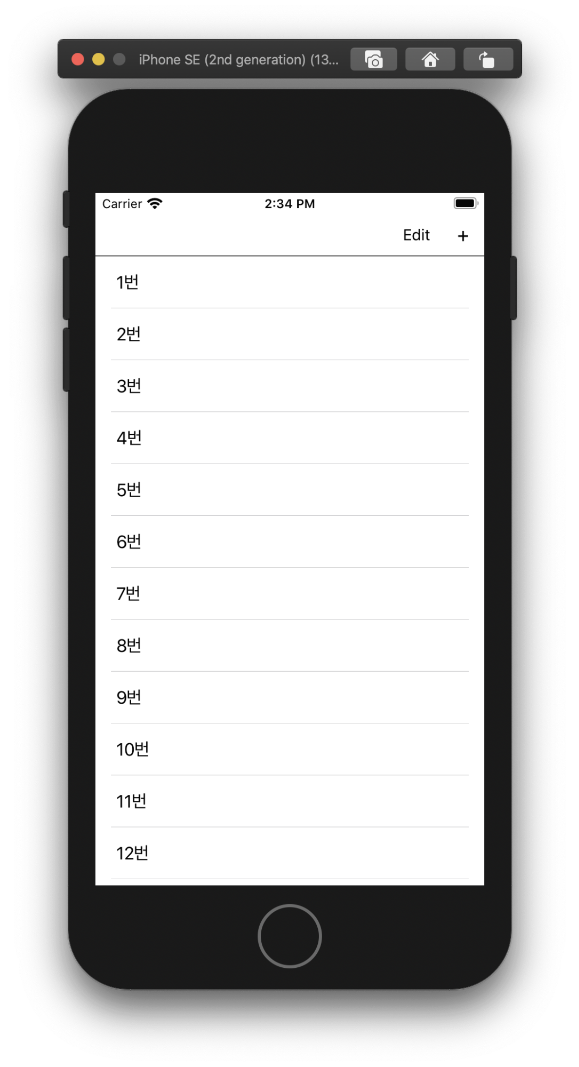
이제 앱을 실행시켜 확인해보자.
4. addItem() 구현
Cell 추가 기능을 하는 addItem()을 구현한다.
textField를 포함하고 있는 Alert를 생성하여 확인을 누르면 Cell을 추가하고 reloadData()를 호출한다.
그리고 추가된 Cell은 가장 아래에 위치하므로
추가된 Cell을 보여주기 위해 TableView의 가장 아래로 이동해주는 scrollToBottom()을 호출한다.
|
1
2
3
4
5
6
7
8
9
10
11
12
13
14
15
16
17
18
19
20
21
22
23
24
25
26
27
28
29
30
31
32
33
34
35
36
37
38
39
40
41
42
43
44
45
46
47
48
49
50
51
|
class ViewController: UIViewController {
@IBOutlet weak var editTableView: UITableView!
@IBOutlet weak var editDoneButton: UIButton!
var itemName = [String]()
override func viewDidLoad() {
super.viewDidLoad()
self.editTableView.dataSource = self
self.editTableView.delegate = self
self.add20Items()
}
func add20Items() {
print("add20Items")
for _ in 0..<20 {
self.itemName.append("\(self.itemName.count+1)번")
}
self.editTableView.reloadData()
self.view.hideActivityIndicatorView()
}
func scrollToBottom(){
let lastRowOfIndexPath = self.editTableView.numberOfRows(inSection: 0) - 1
DispatchQueue.main.async {
let indexPath = IndexPath(row: lastRowOfIndexPath, section: 0)
self.editTableView.scrollToRow(at: indexPath, at: .bottom, animated: true)
}
}
@IBAction func editTable(_ sender: Any) {
}
@IBAction func addItem(_ sender: Any) {
let alert = UIAlertController(title: "추가", message: "Row Name을 입력해주세요.", preferredStyle: .alert)
alert.addTextField { textField in
textField.placeholder = "Row Name"
}
alert.addAction(UIAlertAction(title: "확인", style: .default, handler: { _ in
guard let text = alert.textFields?[0].text else { return }
if text != "" {
self.itemName.append(text)
self.editTableView.reloadData()
self.scrollToBottom()
}
}))
alert.addAction(UIAlertAction(title: "취소", style: .cancel, handler: nil))
self.present(alert, animated: true, completion: nil)
}
}
|
cs |
5. Editing Style 구현
IBAction으로 추가했던 editTable() 메소드에 클릭 시
TableView의 isEditing값에 따라 버튼 타이틀과 모드를 바꿔주도록 한다.
|
1
2
3
4
5
6
7
8
9
10
11
12
13
14
15
16
17
18
19
20
21
22
23
24
25
26
27
28
29
30
31
32
33
34
35
36
37
38
39
40
41
42
43
44
45
46
47
48
49
50
51
52
53
54
55
56
57
58
|
class ViewController: UIViewController {
@IBOutlet weak var editTableView: UITableView!
@IBOutlet weak var editDoneButton: UIButton!
var itemName = [String]()
override func viewDidLoad() {
super.viewDidLoad()
self.editTableView.dataSource = self
self.editTableView.delegate = self
self.add20Items()
}
func add20Items() {
print("add20Items")
for _ in 0..<20 {
self.itemName.append("\(self.itemName.count+1)번")
}
self.editTableView.reloadData()
self.view.hideActivityIndicatorView()
}
func scrollToBottom(){
let lastRowOfIndexPath = self.editTableView.numberOfRows(inSection: 0) - 1
DispatchQueue.main.async {
let indexPath = IndexPath(row: lastRowOfIndexPath, section: 0)
self.editTableView.scrollToRow(at: indexPath, at: .bottom, animated: true)
}
}
@IBAction func editTable(_ sender: Any) {
if self.editTableView.isEditing {
self.editDoneButton.setTitle("Edit", for: .normal)
self.editTableView.setEditing(false, animated: true)
} else {
self.editDoneButton.setTitle("Done", for: .normal)
self.editTableView.setEditing(true, animated: true)
}
}
@IBAction func addItem(_ sender: Any) {
let alert = UIAlertController(title: "추가", message: "Row Name을 입력해주세요.", preferredStyle: .alert)
alert.addTextField { textField in
textField.placeholder = "Row Name"
}
alert.addAction(UIAlertAction(title: "확인", style: .default, handler: { _ in
guard let text = alert.textFields?[0].text else { return }
if text != "" {
self.itemName.append(text)
self.editTableView.reloadData()
self.scrollToBottom()
}
}))
alert.addAction(UIAlertAction(title: "취소", style: .cancel, handler: nil))
self.present(alert, animated: true, completion: nil)
}
}
|
cs |
editDoneButton버튼을 클릭하면 editTableView의 isEditing 값에 따라
버튼의 title과 editTableView의 editing style을 바꿔준다.
현재 상태에서는 왼쪽의 -버튼을 클릭해도 아무런 반응이 없으므로
따로 메소드를 구현해줘야한다.
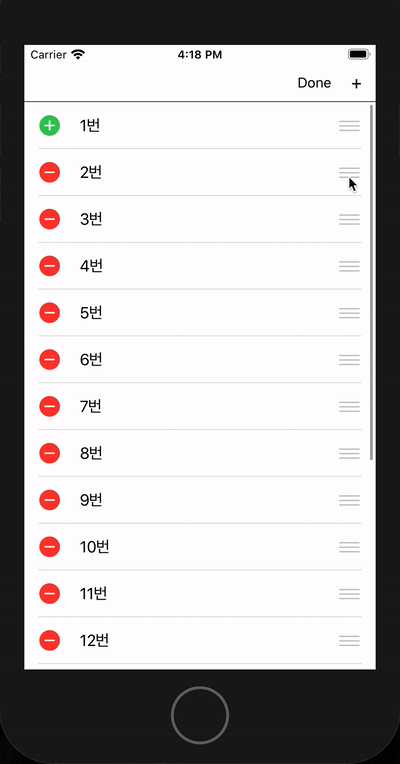
EditingStyle에는 none, delete, insert가 있으며
TableView의 메소드로 원하는 Cell에 원하는 EditingStyle을 적용할 수 있다.
editingStyleForRowAt 메소드에서 0번째 row만 EditingStyle을 insert, 나머지는 delete로 설정하고
commit editingStyle 메소드에서 insert, delete에 대해 어떻게 작동할지를 구현한다.
|
1
2
3
4
5
6
7
8
9
10
11
12
13
14
15
16
17
18
19
20
21
|
//Edit Mode에서 Row별 모드 지정
func tableView(_ tableView: UITableView, editingStyleForRowAt indexPath: IndexPath) -> UITableViewCell.EditingStyle {
if indexPath.row == 0 {
return .insert
} else {
return .delete
}
}
//Edit Mode의 +, - 버튼
func tableView(_ tableView: UITableView, commit editingStyle: UITableViewCell.EditingStyle, forRowAt indexPath: IndexPath) {
if editingStyle == UITableViewCell.EditingStyle.delete {
print("delete")
self.itemName.remove(at: indexPath.row)
tableView.deleteRows(at: [indexPath], with: .automatic)
} else {
print("insert")
self.itemName.insert(self.itemName[indexPath.row], at: indexPath.row + 1)
tableView.insertRows(at: [indexPath], with: .automatic)
}
}
|
cs |
editingStyle이 insert일 경우에 +버튼을 클릭한 Row의 아래에 똑같은 Row를 복사하도록 구현하였다.
6. Editing Mode에서 Row 이동시키기
moveRowAt 메소드를 사용하면 Editing Mode에서 Row를 이동시킬 수 있다.
이 메소드의 인자값에는 sourceIndexPath와 destinationIndexPath가 있어서
Row를 이동시켰을 때 어떻게 처리할 지에 대해 구현할 수 있다.
sourceIndexPath의 Row를 remove하고
destinationIndexPath에 insert하도록 했다.
|
1
2
3
4
5
6
7
|
//Edit Mode의 Row 이동
func tableView(_ tableView: UITableView, moveRowAt sourceIndexPath: IndexPath, to destinationIndexPath: IndexPath) {
print("\(self.itemName) from: \(sourceIndexPath.row) -> to: \(destinationIndexPath.row)")
let targetItem: String = self.itemName[sourceIndexPath.row]
self.itemName.remove(at: sourceIndexPath.row)
self.itemName.insert(targetItem, at: destinationIndexPath.row)
}
|
cs |

참고로 Row Move 캡쳐에서 1번Row를 Move한 후에 +버튼을 눌렀을 때
+버튼이 맨 위의 Cell로 이동하는 이유는
commit editingStyle 메소드의 deleteRows() 또는 insertRows()가 실행된 후에
TableView의 Cell에 변동이 일어났으므로 reloadData()를 호출하여
TableView를 다시 그리는 것과 같은 작업이 진행되기 때문인 것 같다.
|
1
2
3
4
5
6
7
8
9
10
11
12
13
14
15
16
17
18
19
20
21
22
23
24
25
26
27
28
29
30
31
32
33
34
35
36
37
38
39
40
41
42
43
44
45
46
47
48
49
50
51
52
53
54
55
56
57
58
59
60
61
62
63
64
65
66
67
68
69
70
71
72
73
74
75
76
77
78
79
80
81
82
83
84
85
86
87
88
89
90
91
92
93
94
95
96
97
98
99
100
101
102
103
104
105
106
107
108
109
110
111
112
113
114
115
116
117
118
119
120
121
122
123
|
class ViewController: UIViewController {
@IBOutlet weak var editTableView: UITableView!
@IBOutlet weak var editDoneButton: UIButton!
var itemName = [String]()
override func viewDidLoad() {
super.viewDidLoad()
self.editTableView.dataSource = self
self.editTableView.delegate = self
self.add20Items()
}
func add20Items() {
print("add20Items")
for _ in 0..<20 {
self.itemName.append("\(self.itemName.count+1)번")
}
self.editTableView.reloadData()
self.view.hideActivityIndicatorView()
}
func scrollToTop(){
DispatchQueue.main.async {
let indexPath = IndexPath(row: 0, section: 0)
self.editTableView.scrollToRow(at: indexPath, at: .top, animated: true)
}
}
func scrollToBottom(){
let lastRowOfIndexPath = self.editTableView.numberOfRows(inSection: 0) - 1
DispatchQueue.main.async {
let indexPath = IndexPath(row: lastRowOfIndexPath, section: 0)
self.editTableView.scrollToRow(at: indexPath, at: .bottom, animated: true)
}
}
@IBAction func editTable(_ sender: Any) {
if self.editTableView.isEditing {
self.editDoneButton.setTitle("Edit", for: .normal)
self.editTableView.setEditing(false, animated: true)
} else {
self.editDoneButton.setTitle("Done", for: .normal)
self.editTableView.setEditing(true, animated: true)
}
}
@IBAction func addItem(_ sender: Any) {
let alert = UIAlertController(title: "추가", message: "Row Name을 입력해주세요.", preferredStyle: .alert)
alert.addTextField { textField in
textField.placeholder = "Row Name"
}
alert.addAction(UIAlertAction(title: "확인", style: .default, handler: { _ in
guard let text = alert.textFields?[0].text else { return }
if text != "" {
self.itemName.append(text)
self.editTableView.reloadData()
self.scrollToBottom()
}
}))
alert.addAction(UIAlertAction(title: "취소", style: .cancel, handler: nil))
self.present(alert, animated: true, completion: nil)
}
}
//MARD: - UITableViewDataSource
extension ViewController: UITableViewDataSource {
// Row 개수
func tableView(_ tableView: UITableView, numberOfRowsInSection section: Int) -> Int {
return self.itemName.count
}
// Row의 Cell 생성
func tableView(_ tableView: UITableView, cellForRowAt indexPath: IndexPath) -> UITableViewCell {
let cell = tableView.dequeueReusableCell(withIdentifier: "editCell", for: indexPath) as! EditTableViewCell
cell.selectionStyle = .none
cell.itemNameLabel.text = self.itemName[indexPath.row]
return cell
}
}
//MARD: - UITableViewDelegate
extension ViewController: UITableViewDelegate {
// Row의 높이 설정
func tableView(_ tableView: UITableView, heightForRowAt indexPath: IndexPath) -> CGFloat {
return 50
}
//Edit Mode에서 Row별 모드 지정
func tableView(_ tableView: UITableView, editingStyleForRowAt indexPath: IndexPath) -> UITableViewCell.EditingStyle {
if indexPath.row == 0 {
return .insert
} else {
return .delete
}
}
//Edit Mode의 +, - 버튼
func tableView(_ tableView: UITableView, commit editingStyle: UITableViewCell.EditingStyle, forRowAt indexPath: IndexPath) {
if editingStyle == UITableViewCell.EditingStyle.delete {
print("delete")
self.itemName.remove(at: indexPath.row)
tableView.deleteRows(at: [indexPath], with: .automatic)
} else {
print("insert")
self.itemName.insert(self.itemName[indexPath.row], at: indexPath.row + 1)
tableView.insertRows(at: [indexPath], with: .automatic)
}
}
//Edit Mode의 Row 이동
func tableView(_ tableView: UITableView, moveRowAt sourceIndexPath: IndexPath, to destinationIndexPath: IndexPath) {
print("\(self.itemName) from: \(sourceIndexPath.row) -> to: \(destinationIndexPath.row)")
let targetItem: String = self.itemName[sourceIndexPath.row]
self.itemName.remove(at: sourceIndexPath.row)
self.itemName.insert(targetItem, at: destinationIndexPath.row)
}
}
|
cs |
끝.
참고
m.blog.naver.com/jdub7138/220958881556
https://stackoverflow.com/questions/34157800/set-table-view-into-editing-mode
'이상 > iOS' 카테고리의 다른 글
| [iOS] UIRefreshControl의 발견 (0) | 2020.07.15 |
|---|---|
| [iOS] UITableView Swipe Actions (0) | 2020.07.14 |
| [iOS] 엔터프라이즈 배포 (0) | 2020.07.06 |
| [iOS] CheckBox 만들기 with Delegate (0) | 2020.07.06 |
| [iOS] UIScrollView(Vertical) 만들기 (0) | 2020.06.18 |


